These are the steps to remove Win8 that came with the PC and replace it with a Win7 from USB drive. The main issue is that Win8 has a partition protection called GPT and it needs to be removed before the new copy of Win7 can be installed.
IMPORTANT: This procedure will delete all data from the disk. You should back up all your data into a different disk before following this steps.
Boot mode (BIOS setting)
First of all, make sure the “BOOT MODE” in your BIOS options is set to “Legacy BIOS” (and not UEFI).
Also, while in the BIOS, make sure you are selecting the correct boot device and/or boot order so the PC can start running the Win7 installer.

Removing the Win8 GPT protection
By default, Win8 comes with a partition protection called “GPT”, and the Win7 installation cannot continue until this protection is removed.
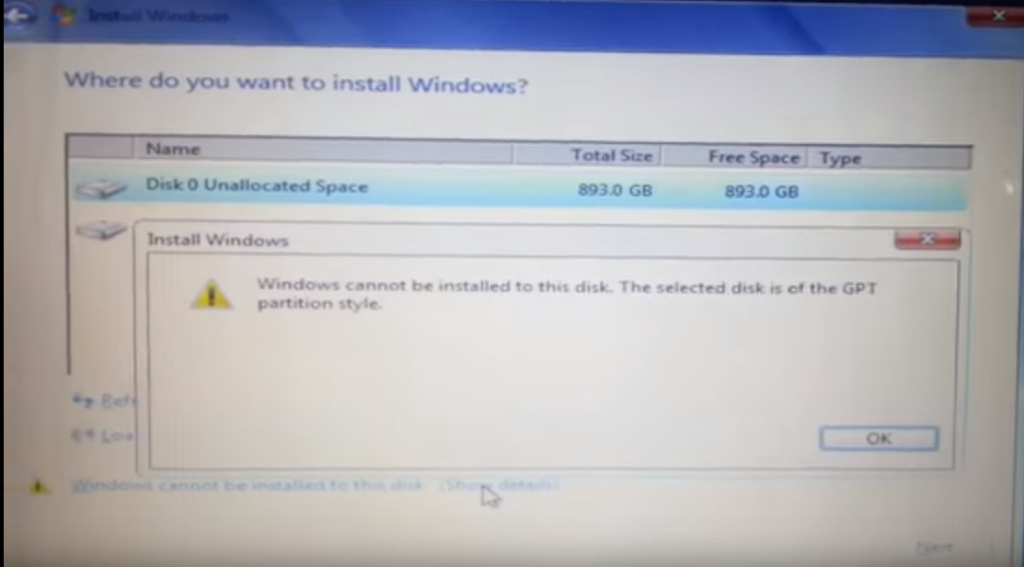
Win8 GPT protection has to be removed when the installer reaches the point of having to select the partition where Win7 will be installed. You will see a message saying something like “windows cannot be installed on this disk. The selected disk is of the GPT partition style”
To remove this protection, start by pressing Shift + F10 and you will see a black console window opening.
Once in the console, type the diskpart command to access the disk partition utility.
Now the disk partition utility is ready to continue taking your console commands.
Use the following commands, in this exact order:
1) To see a list of available disks: list disk – This will show you a list of available disks in the PC. You can recognize your desired target disk by looking at the total size, notice that the disks are numbered (left column) starting with 0 and then 1, 2 and so on.
2) To select the disk where you want to install Win7 (I’m using 0 as the disk number in my example) use the command: select disk 0 Where “0” is the number of the target disk. This will make “Disk 0” the selected disk to which the following commands will apply.

3) To see a list of available partitions: list partition – This will show you a numbered list of partitions within the selected drive. This is not a necessary step but it is a good to take a last look at the partitions, because these partitions will be deleted.
4) To remove all partitions from the selected disk and also remove the GPT protection use the command: clean (WARNING: This completely deletes all partitions from the selected disk and deletes all data)
5) Finally you can check whether if the partitions where successfully deleted by listing the partitions again: list partition – Now you should only see a message indicating that there are “no partitions” to be displayed.
You are done
Now you can just close the console window and hit the “Refresh” button to select the desired location for your fresh copy of Win7.
Finally, here’s a video showing the whole process.